This is the project to create a lab environment contains 2 node ESXi 5.0 host cluster and a software iSCSI machine.
My hardware is all identical Lenovo X61, 2GB RAM, Intel 82577LM.
This process was a real pain, I had to climb up and down two big hills.
The first obstacle was adding NIC driver to the installation image, the next was MEMORY_SIZE ERROR.
During the installation, the system check runs and if computer doesn’t have more than 1.97 GB, the installation will terminate.
I spent a lot of time searching and finally I was able to install ESXi on my laptop computer.
The below is what I’ve done.
<Add the NIC driver to the iso>
Download ESXi-Customizer (http://www.v-front.de/p/esxi-customizer.html) and driver for NIC at Intel.com.
Create a customized iso image for ESXi 5.0, following ESXi-Customizer instruction on the its website.
<Create a bootable flash drive>
First format USB using commands below.
diskpart (make sure you run diskpart as administrator)
list disk (list the disk in your system including the USB)
select disk USB number
clean
create partition primary
active
format fs=fat32 quick
assign
exit
download linux live USB creater.http://www.linuxliveusb.com/en/download
Follow the instruction and create a bootable USB
<Install ESXi>
Thank to Simon, I was able to get away from the system check to terminate installation.
*Before installation, you have to enable Intel VT from BIOS
Boot from the bootable USB created in the previous step.
At the “Welcome to the VMware ESXi 5.0.0 Installation” screen, press Alt+F1.
At localhost login prompt, enter root
At Password prompt, enter nothing. Just hit Enter
Type # cd /usr/lib/vmware/weasel/util
Delete upgrade_precheck.pyc
rm upgrade_precheck.pyc
Rename upgrade_precheck.py
mv upgrade_precheck.py upgrade_precheck.py.old
cp upgrade_precheck.py.old upgrade_precheck.py
chmod 755 upgrade_precheck.py
Edit the line “MEM_MIN_SIZE = (2 * 1024 – 32) * SIZE_MiB” to MEM_MIN_SIZE = (2 * 1024 – 64) * SIZE_MiB
Vi upgrade_precheck.py
Find the above text string using “/” command and a search string1024 and “n”
If the string is found, press any or “a”, “i” or “o” key to switch the mode.
Modify the text
Type “:wq” to save and exit vi
ps -c | more and find the PID for install
In my case I killed sh resides in bin/vmware/install
kill the process found in the previous step.
Kill <pid>
Automatically go back to Welcome screen.
Continue to follow the installation
Friday, November 9, 2012
Saturday, March 31, 2012
802.1X Wireless Authentication Windows 2008 R2 Infrastructure Configuration - Part3
We have upgraded OS to WIndows 7 on all user machines last month. I needed to create a group policy for Windows 7 machines. It's very simple, just adding a Windows 7 Wireless Network policy to the Wireless Network (IEEE 802.1X) group policy which has been already created previously (See Part2)
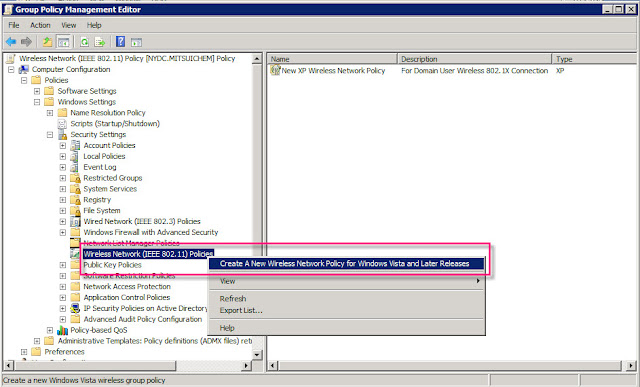
1. Open Group Policy Management Editor
Edit Wireless Network (IEEE 802.1X)
Navigate Computer Configuration --> Policies --> WIndows Setting --> Wireless Policy
Select "Create A New Wireless Network Policy for Windows Vista and Later Releases"
2. Right-click New Wireless Network Policy and select Properties
Type Policy Name
Click Add and select Infrastructure

3. Type Profile Name and SSID
Click Add

4. Select the Security tab
Select WPA2-Enterprise for Authentication and AES for Encryption
Select PEAP for authentication method and User or Computer authentication for authentication mode.
Click Properties

5. Check Validate server certificate
Select the CA certificate
Click OK
That's all for the group policy settings for Windows 7 computers.

1. Open Group Policy Management Editor
Edit Wireless Network (IEEE 802.1X)
Navigate Computer Configuration --> Policies --> WIndows Setting --> Wireless Policy
Select "Create A New Wireless Network Policy for Windows Vista and Later Releases"

2. Right-click New Wireless Network Policy and select Properties
Type Policy Name
Click Add and select Infrastructure

3. Type Profile Name and SSID
Click Add

Select WPA2-Enterprise for Authentication and AES for Encryption
Select PEAP for authentication method and User or Computer authentication for authentication mode.
Click Properties

5. Check Validate server certificate
Select the CA certificate
Click OK
That's all for the group policy settings for Windows 7 computers.

Tuesday, March 6, 2012
Create Windows 7 Enterprise Image -Part2
If you try to sysprep Windows 7 Enterprise base image created by upgrading from Professional, you will end up with an error message "Sysprep cannot run on a computer that has been upgraded to a new version of Windows"
Delete the following registry key. You should be able to sysprep.
HKLM\System\Setup\Upgrade
Monday, March 5, 2012
Create Windows 7 Enterprise Image - Part 1
It's about time that 6-year-old laptop computers retire and enjoy their retirement life in the dark storage room.
About 30 Toshiba Portege R830-S8332 arrived in my workshop.
I needed to create a Windows 7 Enterprise base image with standard applications such as Office 2010 to sysprep and then deploy with WDS.
First, I clean installed Windows 7 Enterprise and added necessary drivers. This was not a good idea. Even after the all drivers were installed, there were two devices with an exclamation listed on the device manager and point function keys were not working.
The laptop has OEM version of Windows 7 Professional preinstalled. I wondered if I could install Enterprise edition over to Professional somehow.
Yes, there is a way to upgrade Professional to Enterprise.
This could be done by changing two registry values.
HKLM\Software\Microsoft\Windows NT\CurrentVersion\EditionID --> Change to Enterprise
HKLM\Software\Microsoft\Windows NT\CurrentVersion\ProductName --> Change to Enterprise

If both editions are SP1, you need to uninstall SP1 and upgrade.
HKLM\Software\Microsoft\Windows NT\CurrentVersion\ProductName --> Change to Enterprise

If both editions are SP1, you need to uninstall SP1 and upgrade.
Sunday, January 8, 2012
802.1X Wireless Authentication Windows 2008 R2 Infrastructure Configuration - Part2
<Part 2>
DC - Create Wireless Group Policy
CA - Create the Server Cert for NPS server
NPS - Export NPS Server Cert and CA Cert


8. In DC, Create and Configure XP Wireless Network Group Policy


Select Personal and Certificates
Locate and right-click NPS_ServerCert
Select All Tasks à Export

Certificate Export Wizard will start
Make sure "Yes, export the private key" is selected
You need the password when you install the cert to Aruba


Remember the password you enter here.
You need it when you install the cert to Aruba

Put a name and select the location to export the cert

DC - Create Wireless Group Policy
CA - Create the Server Cert for NPS server
NPS - Export NPS Server Cert and CA Cert
7. In CA, Create a RAS Certificate for Network Policy Service
Click Start and select Run
Type mmc and click OK
Go to Fileà Add/Remove Snap-ins
Add Certificate Template and Certificate Authority
Type mmc and click OK
Go to Fileà Add/Remove Snap-ins
Add Certificate Template and Certificate Authority

Create a server certificate for the NPS server
Select Certificate Template
Right-click on the RAS and IAS Server and select Duplicate Template

Select "Windows Server 2008 Enterprise"
In the General tab, enter a name for this template and change Validity period if you want
In the Request Handling, check "Allow private key to be exported"
This setting is very important
This certificate needs to be exported with private key later to install to Aruba.

In the Security tab, allow "Autoenroll" for RAS and IAS Servers

Selecct Certificate Template of CA
Right-click on the template created in previous steps
Select "Certificate Template to Issue"
Select Certificate Template
Right-click on the RAS and IAS Server and select Duplicate Template

Select "Windows Server 2008 Enterprise"
In the General tab, enter a name for this template and change Validity period if you want
In the Request Handling, check "Allow private key to be exported"
This setting is very important
This certificate needs to be exported with private key later to install to Aruba.


Right-click on the template created in previous steps
Select "Certificate Template to Issue"

Create a new Group Policy called Wireles Network (IEEE 802.11x) and edit it
Computer Configuration --> Windows Settings --> Security Settings --> right-click on the Wireless Network Policy and select "Create A New Wireless Network Policy for XP
My configuration is for XP.
Computer Configuration --> Windows Settings --> Security Settings --> right-click on the Wireless Network Policy and select "Create A New Wireless Network Policy for XP
My configuration is for XP.

Right-click on New XP Wireless Network Policy and select Properties
Select the Preferred Networks tab

Click Add... and select your wireless networks SSID
Select the network you just added and cick Edit...

Confirm WPA2 and AES is selected for Authentication and Encryption respectively

Select "Microsoft: Protected EAP (PEAP) and click Settings...

Check your Certificate Authorities. This should be in a format like%Mydomain%-%CAServerName%-CA where Mydomain is your domain name and CAServerName is the server name that holds the Certifiate Authority role
The Wireless Network (IEEE 802.1X) Group Policy has been created
Now add Wireless Group to the Wireless Network (IEEE 802.1X) Group Policy

Now add Wireless Group to the Wireless Network (IEEE 802.1X) Group Policy

9. In NPS, export NPS Cert and CA cert so that they can be installed to Aruba
Start à Run à mmc à File menu à Add/remove Snap-ins
Add Certificates (Computer account, Local computer)
Add Certificates (Computer account, Local computer)

Locate and right-click NPS_ServerCert
Select All Tasks à Export

Make sure "Yes, export the private key" is selected
You need the password when you install the cert to Aruba

You need it when you install the cert to Aruba


Now export CA Cert
Select Trusted Root Certification Authority and Certificates
Select the CA cert
Select "DER encoded binary X.509 (.CER)
Put a name and select the location to export
Once these two certs are imported to Aruba, the configuration completes.
You may need to run the gpupdate command on a test machine before testing.
Select Trusted Root Certification Authority and Certificates
Select the CA cert

Select "DER encoded binary X.509 (.CER)
Put a name and select the location to export

Once these two certs are imported to Aruba, the configuration completes.
You may need to run the gpupdate command on a test machine before testing.
Subscribe to:
Posts (Atom)