Search This Blog

Thursday, November 3, 2011

802.1X Wireless Authentication Windows 2008 R2 Infrastructure Configuration - Part1

<Part 1>
DC - Create Wireless Group, Group Policies
CA - Install and Create Enterprise Certificate Authority
NPS - Install NPS, Add RADIUS client, Create 802.1X Wireless Policy

Back in October, our 5-year-old BlusSocket Wireless Controller went down suddenly and never came back to life. We needed a replacement within two weeks because we expected about ten guests to visit our office for several important meetings. Our vendor recommended and implemented Aruba 620. This was a good opportunity for me to tighten up the wireless netowrk security.


Our old wireless network used WPA-Personal, which requires the both of client machine and controller to have the same preset passphrase. Any computers, devices and users could access the wireless LAN with the passphrase.
There are many security holes in this mechanism.
I decided to implement 802.1x authentication, which requires different components such as DC, CA, NPS and Group Policy and complecated to deploy but it's worth the cost. 


Once you have 802.1X authentication, whenever an eligible domain user logs in a domain computer,  he/she automatically connects to the wireless network.


To accomplish 802.1X, you need Domain Contoller, CA (Certificate Authority) and NPS (Network Policy Service). These three roles can be installed on one server.


1. Create a WirelessUsesr group to apply 802.1X Wireless NPS Policy and XP Wireless Network Group Policy
In DC, create Wireless Security group and add users
Give Wireless group an Apply Group Policy Permission

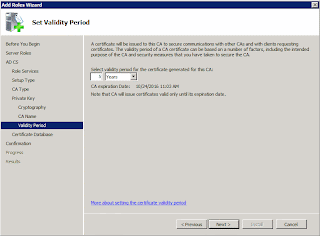
2. Install Active Directory Certificate Service
In any domain member server, install the Certificate Authority role, which is a part of Active Directory Certificate Service role
In this case, this is the first enterprise CA.


3. In DC, Modify the Default Domain Group Policy so that client computers install the certificate automatically
4. In any domain member server, Install Network Policy Service
Add Network Policy and Access Services role à Network Policy Service.
5. Create a RADIUS client
In the NPS server, register Aruba as a RADIUS client
Shared secret must be the same as the one entered in Aruba


6. Create and Configure 802.1X Wireless Policy
When you click Configure802.1X, the wizard will start

 
Select "Secure Wireless Connections" and type any name for this connection
Add Aruba (RADIUS Client) created in the step 5
Select "Microsoft: Protected EAP (PEAP)"
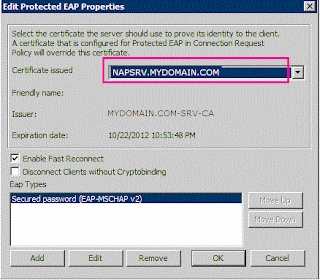
 Select the NPS certificate, which should be like YourNPSServerName.YourDomain.COM Click Configure...


Select the group created in the step1
Click Next in Configure Traffic Controls
Click Finish
Check the newly-created Secure Wireless Connection policy
You can change the configuration from the properties
Corresponding Connection Request policy has been created automatically


Continue to Part 2               

Wednesday, October 19, 2011

DHCP Server Cleaning

I've been working on the domain controller server replacement and OS upgrade from 2003 to 2008 R2.
Each DC has DHCP, DNS and other roles as well. One of them held all FSMO roles and time server role.,

Two physical machines have been replaced with a HP ProLiant DL160 G6 and a virtual machine so far.

I knew non-existing servers somehow still remain in Active Directory as authorized DHCP servers because they are listed as authorised DHCP servers Since the servers themselves dont' exist physically in the domain, when I tried to unauthorize them, I got an error message "an object can not be found" or something and can remove them.
I decided to clean up dead DHCP servers. This process is done on ADSIEdit.


To install ADSIEdit console, type the following command in Run to register dll.
regsvr32 adsiedit.dll

Click Start and select Run. Type "mmc".
Form the File menu select Add/Remove snap-in.
Add ADSIEdit.lmmc.

Once ADSIEdit.msc opens expand Configuration in the left pane.
If you don't have Configuration, right-click ADSIEdit in the left pane and select Connect to....
Click "Select a well known connection point" and select "Configuration" (Woops... Default naming context is enclosed in the below image.)


Navigate Select CN=Services --> CN=NetServices
Right click on CN=DHCPRoot in the middle pane and select properties.
In the CN=DHCPRoot, select DHCPServers and click the Edit button.


High-light the server you want to remove from your domain and click Remove.
Click OK.
 If the server is still alive, you don't have to do this. This process is for the situation that the server was removed from the domain without unauthorizing.

Now that the non-existing DHCP server entries have been cleared from AD, we clean up junk from AD Site and Service.
Open Active Directory Site and Service.
Select the site and servers on the left pane.
Right-click on the ghost DHCP server, which should be empty.
Select delete.


Monday, September 5, 2011

2008 R2 Failover Cluster - HA Senario

Having the system with no single point of failure has been my dream since I started working at the current office over three years ago.
I've been insisting the company's management how important to have redundant system since then. Finally I got approval to purchase two brand new servers with multiple NICs, SAN and 2 Catalyst switches for the cluster system. All VMs are running on the cluster. My fear has gone!

Devices:
HP ProLiant DL380 G7 (2 x Xeon 5650, 24GB, 8 x Gigabit NIC)
2 x Cisco Catalyst 2960
HP MSA2324i G2

Network Setting:
2 x Cluster (10.0.0.0/8) -- >  NIC Teaming
3 x SAN (10.0.10.0/24)
3 x LAN (192.168.30.0/24)  -- >  NIC Teaming

OS:
2 x Microsoft Windows 2008 R2 Datacenter
(Failover Cluster is not available for Standard Edition. You need Enterprise or Datacenter. )


1. Install 2008 R2 OS and install the latest NIC driver, all patches and updates .
Don’t forget to update drivers also. All nodes in the cluster must have the same drivers, updates and patches.

2. Configure Networks
You should have multiple networks separated from each other depending on their functions. 5 dedicated networks shown below is ideal if you can afford. In my  case, I have dedicated netowrks for 1 and 5 the rest, 2, 3 and 4 share one network.
  1. Cluster communication
  2. Live Migration
  3. Client communication
  4. Management
  5. Storage
The below table shows required protocols for each network. The cluter network uses SMB and IPv6. Make sure those protocols are enabled in the cluster network properties.


Client for Microsoft Netowrks
File & Printer sharing
TCP/IP Ver4
TCP/IP Ver6
Cluster Network
Yes
Yes
Yes
Yes
LAN
Yes
Yes
Yes
Yes
SAN
No
No
Yes
No

Also NetBIOS should be disabled for cluster and SAN.

Previously I often heard that NIC teaming didn't work with Hyper-V well. Many NIC vendors supports teaming on Hyper-V now. If you are looking to NIC teaming, check your hardware vender’s website and use the driver supports teaming and Hyper-V. 

When HP NIC Teaming is used in conjunction with Hyper-V, the order of installation becomes crucial. Each component has to be installed in the certain order.
Add Hyper-V roll -- > HP NIC Teaming Utility -- > Configure Teaming -- > Create Hyper-V
http://h20000.www2.hp.com/bc/docs/support/SupportManual/c01663264/c01663264.pdf

3. Install the Failover Cluster feature
Cluster installation is straight forward and many documentations are available, so I will skip this part.

4. Optimizing networks
Once the Failover Cluster wizard complete, you will see the Networks section in the left pane in the Failover Cluster Manager. 
Configure which network the clustered shared volume uses by setting properties of each netowrk.

Check "Allow cluster network communication on this netowrk" for the cluster communication. If you want clients to use the netowrk, check "Allow clients to connect through this network" For SAN, check "Do not allow cluster netowrk communication on this network".
You can view the configuration by running Powershell commandlets.

Imort-Module FailoverClusters

Get-ClusterNetowrk | ft name, role, autometric, metric

Role=1: Use this network for CSV communication.
Role=3: Use this network for CSV communication and clients.
Role=0: CSV doesn't use this netowork
The network with the smalles metric value is used for the cluster communication. The network with the second smallest metric is used for Live Migration.

I explained the details focusing on the netowrk configuration and tuning up because not so may articles and documentations cover the network in detail.

I just found and read a good article today by John Savill, "Introduction to Cluster Shared Volumes" in Windows ITPro September issue. If you want to know more about the cluster, you should check it out.

Monday, July 25, 2011

Windows 7 Native Boot from VHD

When I bought my home computer (HP p6330f, Intel i3, 6GB RAM), I wiped the HDD and installed Windows 2008 R2 Enterprise Edition and set it up as a Hyper-V host. My main purpose of installing the server OS is to build a virtual lab environment to try different applications.

For fun staff (like checking e-mail, web sites, watching videos, writing blog articles....), I created Windows 7 VM. But as you know, virtual machines have hardware limitations like, USB device is recognized directly, audio and video driver compatibility issue. My Windows 7 VM doesn't have audio capability either.
The parent OS has also a known limitation in playing mov and mpeg4 format, so I decided to set up the PC so that it boots Windows 7 natively from VHD.
Now my Windows 7 can play audio & video and recognize USB devices natively.

The procedure is very simple but some points you should know.
You need a VHD installed Windows 7 Enterprise or Ultimate. (other editions of Windows 7 don't have this capability). You can create VM and copy a vhd file anywhere in your local drive but the disk must be basic not dynamic and formatted as NTFS.
A VHD can not be saved in a shared folder.

1. Start Command Prompt as an administrator

2. Type the following commands
BCDEDIT /copy {current} /d "Windows 7 (VHD)"
Windows 7 (VHD) is the name that will be listed when the machine boot, so you can choose any name you want.
The ID (9829fe28-ab1e-11e0-b6ba-d34fb3d32885) will be displayed. Use this ID for the next three commands

3. Type the following commands one line at a time.
BCDEDIT /set {9829fe28-ab1e-11e0-b6ba-d34fb3d32885} device vhd=[c:]\VMs\PC1.vhd
BCDEDIT /set {9829fe28-ab1e-11e0-b6ba-d34fb3d32885} osdevice vhd=[c:]\VMs\PC1.vhd
BCDEDIT /set {9829fe28-ab1e-11e0-b6ba-d34fb3d32885} detecthal on vhd=[c:]\VMs\PC1.vhd


[C:]\VMs\PC1.vhd is the path to the vhd file you want to use to boot. Do not miss "[" and "]". You will get an error.

After that you can review the change you just made to Boot Configuration.
Type BCDEDIT

4. Reboot PC
Once PC starts, 2 choices, Windows 2008 R2 and Windows 7 (VHD) will be displayed.
Select Windows 7.

In my case, Windows 7 didn't start and went to the next screen asking Start System Recovery or Windows 7 normally. The both options wouldn't work. Windows 7 didn't start because in my PC's BIOS settings SATA controller is set to AHCI while vhd is IDE.
I went into the BIOS settings and change the SATA controller from AHCI to IDE.
Now Windows 7 started as I expected.

5. When I boot to Windows 2008 R2, I had to change the SATA controller settings too. This   time I selected AHCI first but it didn't work (I don't know why). So I selected SCSI. 2008 R2 started.

When Windows 7 started, drivers will be installed and it will reboot again.
After reboot, type the following command.
BCDEDIT /deletevalue {9829fe28-ab1e-11e0-b6ba-d34fb3d32885} detecthal

Friday, July 8, 2011

2008 RDS CAL is Backward Compatible, BUT ...

It can't be installed into 2003 License Server. It has to be installed into 2008 or 2008 R2 License Server.


In 2000 and 2003, as long as I remember, when you purchase the Terminal Service CAL license, you receive the CAL key. That's what I expected but the license for 2008 and 2008R2 is different.
The CAL key will not be provided until you contact Microsoft during the License server configuration.


1. On the Server Manager, click "Add roll" and select "Remote Desktop Services"


2. Select Remote Desktop Licensing

3. If you want to install the license for a forest or a workgroup, check Configure a discovery scope... and select a desirable choice. Otherwise accept the default (Domain).

4. When the Remote Desktop Licensing roll was installed, open RD Licensing Manger from Administrative menu --> Remote Desktop

5. Expand All servers and right-click on the license server

6. Select Active Server. Activate Server Wizard will start.

7. Select Telephone from the Connection method drop down menu.

8. Select the country.

9. Make sure you have the authorization number and license agreement number for the CAL handy. Call the given phone number. The support technician will issue the CAL key and walk you through the rest of the process.

You can run Terminal /RD License service for 120 days without installing a purchased CAL key.


Thursday, June 16, 2011

WDS - Customize theToshiba Portege R700 S-1321 boot image

Customize the boot image by adding drivers for Toshiba Portege R700 S-1321

To create a XP custom boot image for R700 was a nightmare to me.
I put all procedures together for peers trying to do the same thing as I have done and myself. (I'm very forgettable!)


1. Down load AIK and driver packages


- AIK (Automated Installation Kit)
I used boot.wim from AIK (6001.18000.080118-1840-kb3aikl_en.iso) as an original image.
AIK can be downloaded from Microsoft.
http://www.microsoft.com/downloads/en/details.aspx?FamilyID=c7d4bc6d-15f3-4284-9123-679830d629f2
This package can be used to deploy the following OSs.
Windows Server 2003 SP1; Windows XP SP2, Windows Vista
Windows XP SP2 with KB926044
Windows Server 2003 SP1 with KB926044
Windows Server 2003 SP2
Windows Vista family
You need to install AIK on the machine that runs the same OS as your Portege, in my case XP SP3.

- SATA Controller Driver
Vista native boot.wim doesn't include the NIC and AHCI drivers for R700 S-1321, so I needed to download them from Toshiba and Intel site.
I downloaded Intel LAN 14.6 from Toshiba and Intel 5 series AHCI from the Intel web site respectively
Toshiba doesn't provide the AHCI driver, so you have to download it from Intel.


IntelR RST Driver Files (for version 10.1) - F6 Install (32-bit)
IntelR RST Driver Files (for version 10.1) - F6 Install (64-bit)


- NIC Driver
Download Intel LAN Driver Ver. 14.6 (TC00285200A.exe) from Support.Toshiba.com
Extract the file and save it in the convenient place.
I recommend changing the location to save otherwise it will be saved in .tmp format as a default.


2. Install AIK on a PC
  1. Burn the image you downloaded in the Step1 to a DVD using Nero, Sonic or any other third party tool
  2. Insert the DVD into any machine which runs XP (This machine is used for the rest of procedures)
  3. Click Windows AIK Setup to begin the installation
3. Add drivers to the image
I followed the steps Microsoft provided on TechNet.
  1. Click Start --> All Programs --> Microsoft Windows AIK --> Windows PE Tools Command Prompt
  2. At the command prompt, type:
copype.cmd x86 c:\winpe_x86
This will create the folder winpe_x86 under C. DON'T create a folder in advance!
Let copype do that. Otherwise, you will end up with an error

If you want to create a boot image for X64, type amd64 instead of x86. For Itanium boot image, type ia64.

Now you have 2 folders, ISO and mount in winpe_x86


  1. At the command prompt, type:
imagex /mountrw c:\winpe_x86\winpe.wim 1 c:\winpe_x86\mount 

peimg /install=*HTA* c:\winpe_x86\mount\Windows
peimg /install=*MDAC* c:\winpe_x86\mount\Windows
peimg /install=*HTA* c:\winpe_x86\mount\Windows
peimg /install=*Scripting* c:\winpe_x86\mount\Windows
peimg /install=*WMI* c:\winpe_x86\mount\Windows
peimg /install=*XML* c:\winpe_x86\mount\Windows
These commands import Windows packages to the boot image. I’m not sure what each package does exactly, but I included all of them to my image might as well.

4.      Now add the NIC drivers
At the command prompt, type:

peimg /install=C:\NIC\Win32\NDIS5x\*.inf c:\winpe_x86\mount\Windows
peimg /install=C:\NIC\Win32\NDIS61\*.inf c:\winpe_x86\mount\Windows
peimg /install=C:\NIC\Win32\NDIS62\*.inf c:\winpe_x86\mount\Windows

In my case, I extracted NIC and SATA drivers in C:\NIC and C:\AHCI respectively.
Since I didn’t know which one is the right inf file for the NIC, I added all inf files from all folders in Win32.

5.   Add the SATA drivers
At the command prompt, type:
peimg /install= C:\AHCI \*.inf c:\winpe_x86\mount\Windows

  1. The next step is an option but I recommend proceeding so that you can include extra tools in your boot image.
copy “c:\program files\Windows AIK\Tools\x86\imagex.exe” c:\winpe_x86\iso\
copy “c:\program files\Windows AIK\Tools\x86\Servicing” c:\winpe_x86\iso\Servicing /s
copy %windir%\system32\msxml6*.dll c:\winpe_x86\iso\Servicing

  1. At the command prompt, type:
Once you run the command, you will be prompted to confirm the operation. Type “Yes” and hit the enter key. You have to type exactly YES here otherwise you will get an error.
peimg /prep c:\winpe_x86\mount\Windows
imagex /unmount c:\winpe_x86\mount /commit
copy c:\winpe_x86\winpe.wim c:\winpe_x86\ISO\sources\boot.wim

  1. Now the fully customized boot image has been created. I added the image to the Deployment server. You can also create a bootable media. You can burn winpe_x86.iso to a CD-ROM using any third party image copy utility.
oscdimg –n -bc:\winpe_x86\etfsboot.com c:\winpe_x86\ISO c:\winpe_x86\winpe_x86.iso

I will post how to add the image to the Deployment server soon.